DMRIFiberProfile
dmrifiberprofile is a tool that analyzes fiber tracts based on DTI volumes or scalar images.
GUI Mode
DTIPlaygroundLab (Web UI)
Run:
$ dmriplaygroundlab
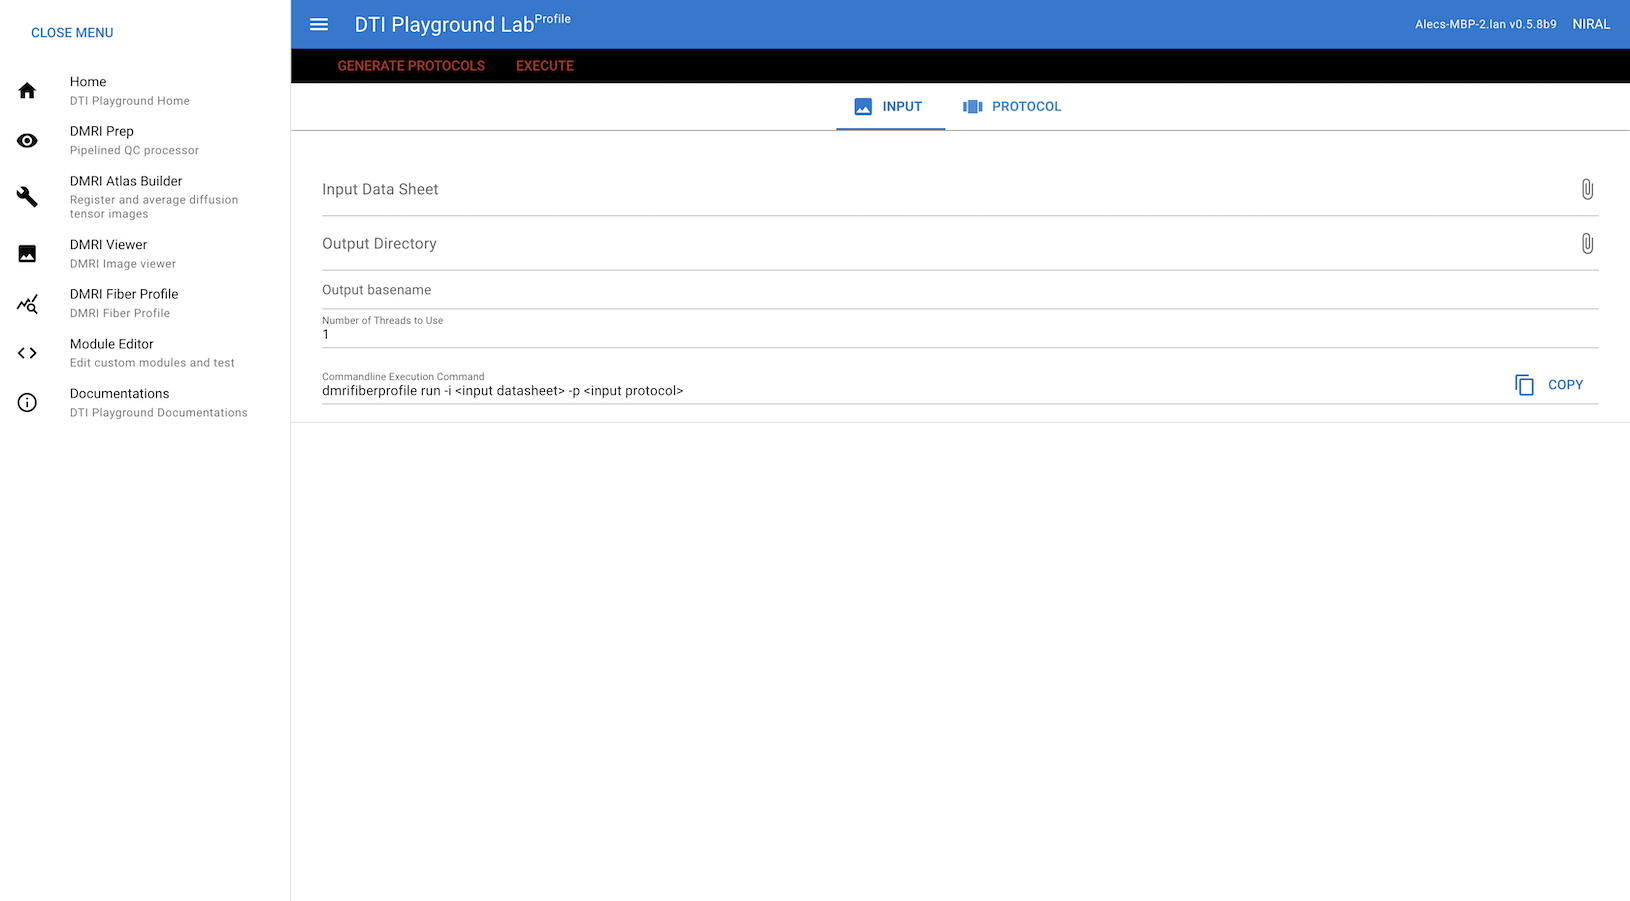
Then go to the DMRIFiberProfile menu. In the INPUT tab, enter the file path to the input datasheet containing the paths to the images to be analyzed. You can click the paper clip icon to browse for the file in a GUI. Do the same for selecting the output directory.
Next, click on the PROTOCOL tab to define the pipeline. For tract profile extraction, double-click the EXTRACT_Profile module to add it to the pipeline.
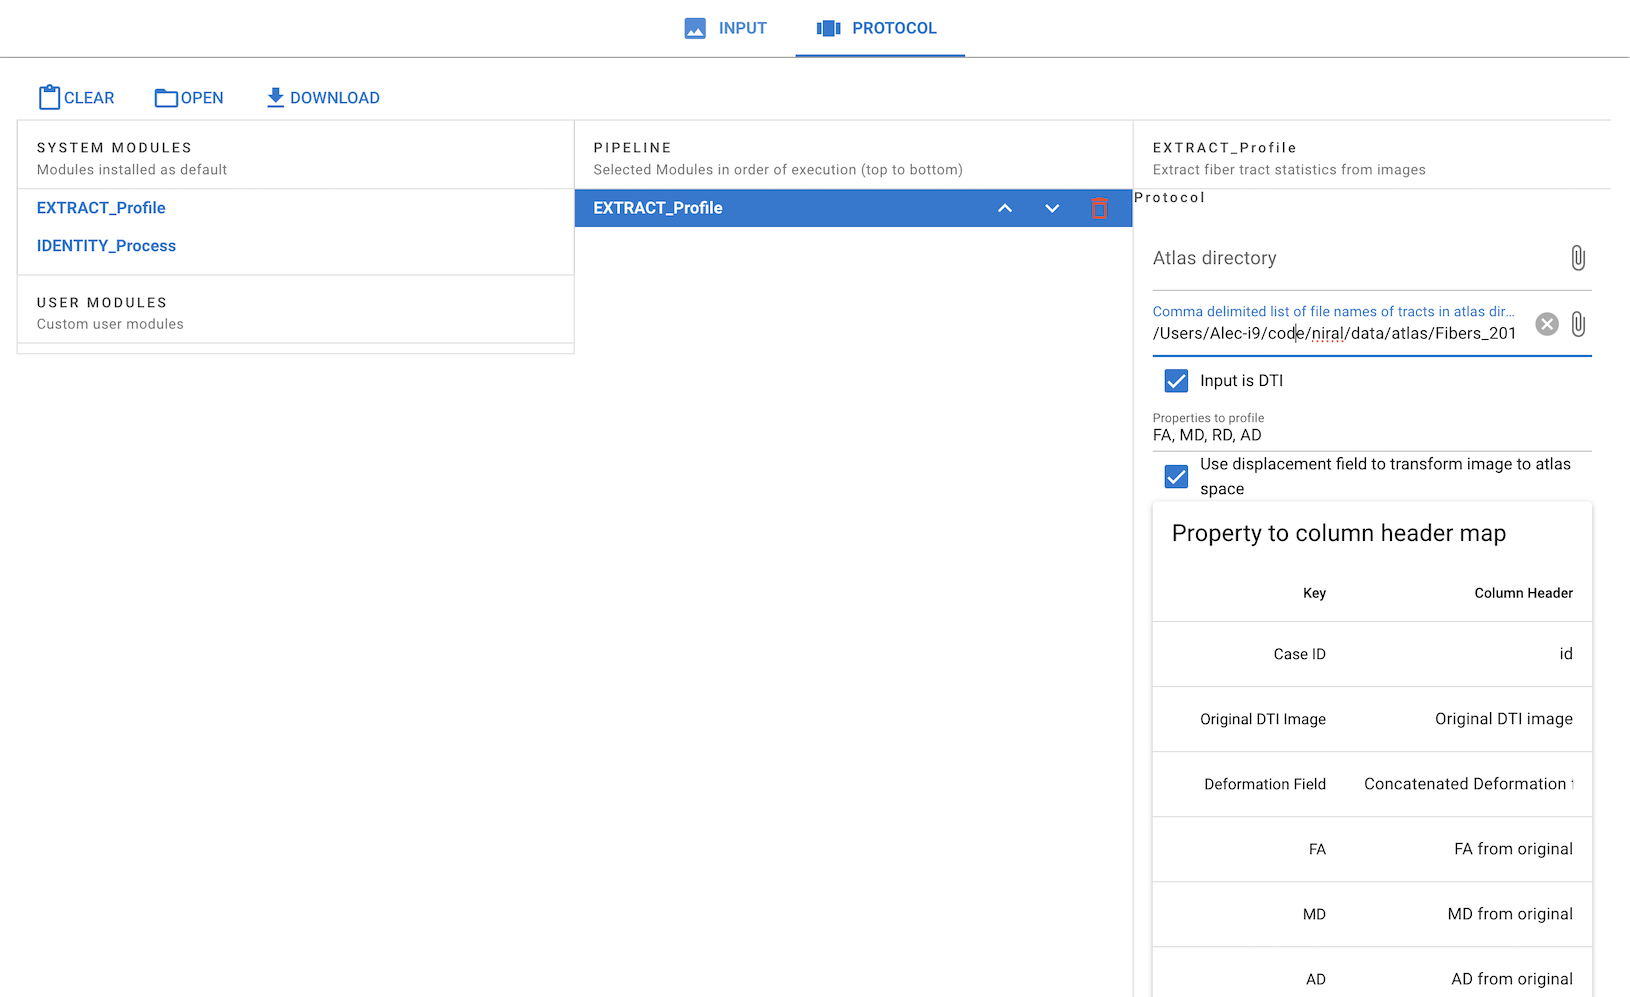
Fill in the fields in the EXTRACT_Profile module protocol. You must provide a comma-separated list of VTK files to profile. If an atlas directory is provided, these file paths may be relative (e.g., tract1.vtk). If no atlas directory is provided, the file paths must be absolute (e.g., /proj/NIRAL/users/alecj/fibers/tract1.vtk).
Check the box for “Input is DTI” if the input images are DTI volumes. If the input images are scalar images, uncheck this box. The program will search for scalar images corresponding to the scalar properties you want to profile.
The “Properties to Column Header Map” allows you to map parameters to the column headers in your input datasheet. Default column headers are provided, but they may not match your CSV. If they don’t, you can edit the “Column Header” field. For example, if your case IDs are in a column called “Subject ID,” you should enter this in the “Column Header” field for the “Case ID” parameter.
Once you’ve entered the requisite fields, you can click the GENERATE PROTOCOLS button to generate the protocol file. This file will be saved in the output directory you specified in the INPUT tab.
Finally, click the EXECUTE button to run the pipeline. Alternatively, you can copy the command and run it directly in the terminal.:
$ dmrifiberprofile run -i INPUT_DATASHEET -p OUTPUT_DIR/protocols.yml
CLI Mode (Linux/Windows-WSL)
For Windows users, install WSL2 and linux packages with python 3.9 - 3.12 (3.11 recommended).
1. init - Initialize configuration (Default: $HOME/.niral-dti/dmrifiberprofile-<version>)
init command generates the configuration directory and files with following command. One just needs to execute this command only once unless a different configuration is needed. If you want to reset the initial configuration directory, you can run init again.:
$ dmrifiberprofile init
If you want to set different config directory other than default one:
$ dmrifiberprofile --config-dir my/config/dir init
Once run, config.yml and environment.yml will be in the directory.
You can manually specify the tool directory (which is generated by install-tools command) by –tools-dir option.:
$ dmrifiberprofile init --tools-dir <path/to/tool_dir>
2. update - Update if config.yml has been changed (e.g. in case of adding user module directory).
Changing config.yml file should be followed by updating environment.yml with running update command
$ dmrifiberprofile [--config-dir my/config/dir] update
This will update module-specific informations such as binary locations or package location used by the corresponding module. It simply updates environment.yml
3. make-protocols - Generating a default protocol file
The first thing to do is generate the default protocol file that has pipeline information:
$ dmrifiberprofile [base options] make-protocols -i INPUT_DATASHEET [-o OUTPUT_DIRECTORY] [-d MODULE1 MODULE2 ... ]
if -o option is omitted, the output protocol will be printed on terminal.`-d` option specifies the list of modules for the analysis, with which command will generate the default pipeline and protocols of the sequence. Same module can be used redundantly. If -d option is not specified, the default pipeline will be generated from the file protocol_template.yml . You can change the default pipeline in protocol_template.yml file.
By default, the only module that will run is EXTRACT_Profile which extracts the profile of the fiber tracts provided.
Modifying the default protocol
If using the EXTRACT_Profile module, the default protocol file has two fields that define the tracts, null by default.
atlas - The directory containing the tracts to be profiled. Must be provided as an absolute path (or with run –atlas).
tracts - The list of tracts to be profiled. Must be provided as a comma-separated list of file names (spaces don’t matter), including the .vtk extension. These file names will be concatenated with the path specified by atlas to form the full path to the tracts. If empty, all the tracts (.vtk) of the atlas directory are profiled.
Optionally, you can also leave the atlas field blank and provide a list of absolute file paths in the tracts field.
If you try to use this protocol without providing an atlas or tracts, you will receive an error message.
Anatomy of EXTRACT_Profile protocol
Below are the options contained in the EXTRACT_Profile protocol.
protocol:
    atlas:
        type: directory
        default_value: null
        description: Directory containing a set of fiber tracts in the atlas to be analyzed.

    tracts:
        type: string
        default_value: null
        description: Selected set of tracts to use. Comma-delimited list of file names with .vtk extension included. Each entry must uniquely map to a VTK fiber file in the atlas location.

    inputIsDTI:
        type: boolean
        default_value: true
        description: Specifies whether the input image is a DTI, and properties are derived from it.

    propertiesToProfile:
        type: list
        default_value: FA, MD, RD, AD
        description: List of selected properties to profile along tracts.

    useDisplacementField:
        type: boolean
        default_value: true
        description: Determines whether to convert the image to atlas space using a displacement field. If set to false, the image will not be transformed to atlas space.

    parameterToColumnHeaderMap:
        type: dictionary
        default_value: null
        description: Optional map of parameters (e.g., scalar names, case id) to column headers to use for each property to profile.

    resultCaseColumnwise:
        type: boolean
        default_value: true
        description: Specifies whether to store cases as columns instead of rows in the output CSV.

    planeOfOrigin:
        type: string
        candidates:
            - value: Median
              description: Origin of profile will be median of tract.
            - value: CoG
              description: Origin of profile will be center of gravity.
        default_value: Median
        description: Determines the plane that sets the origin of the profile arc length.

    stepSize:
        type: integer
        default_value: 1
        description: Specifies how far along the tract to step for each new fiber profile location.

    supportBandwidth:
        type: float
        default_value: 3
        description: Standard deviation (mm) of the Gaussian kernel; points within this distance of a sample are averaged.

    noNaN:
        type: boolean
        default_value: false
        description: Specifies whether to remove fibers with NaN values, used both for FiberPostProcess and DTITractStat.

    mask:
        type: file
        default_value: null
        description: Optional mask file to use during profile extraction. The mask has to be defined in atlas space.
Here’s an example of what the EXTRACT_Profile protocol might look like with the atlas and tracts fields filled in:
protocol:
  atlas: /proj/NIRAL/users/alecjn/test_scripts/DTIPlayground-Tests/tests/input/fiberprofile/atlas
  inputIsDTI: true
  mask: null
  noNaN: false
  parameterToColumnHeaderMap:
    FA: FA for original
    Original DTI Image: Original DTI
  planeOfOrigin: Median
  propertiesToProfile: FA, MD
  resultCaseColumnwise: true
  stepSize: 1
  supportBandwidth: 3
  tracts: Arc_L_FrontoParietal-2_extracted_done.vtk, Corpus_Callosum-2_extracted_done.vtk
  useDisplacementField: true
4. run - Run pipeline
To run with existing protocol file:
$ dmrifiberprofile run -i INPUT_DATASHEET -p PROTOCOL_FILE -o OUTPUT_DIR
PROTOCOL_FILE is the file generated by make-protocols command and appropriately populated with the necessary information.
Instead of a datasheet, -i can be a folder: the files of every scan below it are detected (grouped by case id, the part of the file names before _dwi) and written to OUTPUT_DIR/datasheet_detected.csv, and the column map of the protocol is set to match:
$ dmrifiberprofile run -i DATA_FOLDER -p PROTOCOL_FILE -o OUTPUT_DIR
With useDisplacementField: true (native space) each scan needs its tensor (<id>_dwi[_QCed]_tensor.nrrd or <id>_dwi[_QCed]_DTI.nrrd) and displacement field (…_GlobalDisplacementField.nrrd or …_DTI_DisplacementField.nrrd); with false (atlas space) its registered tensor (…_DeformedDTI.nrrd or …_DTI_Registered.nrrd). The maps of the other properties (e.g. …_NODDI_NDI.nii.gz, …_Registered_NDI.nii.gz) are optional. The run stops with an error listing the known file names if no scan matches. To check the detected datasheet first:
$ dmrifiberprofile make-datasheet DATA_FOLDER -p PROTOCOL_FILE -o datasheet.csv
Without a protocol file, the defaults of EXTRACT_Profile are used; –atlas sets the atlas folder, and without tracts all the tracts (.vtk) of the atlas folder are profiled:
$ dmrifiberprofile run -i DATA_FOLDER --atlas ATLAS_FIBERS_FOLDER -o OUTPUT_DIR
With cleanup: noCleanup (the default), the profile of each scan, tract and property (.fvp) is kept with the settings and input files it was computed from; a later run into the same output folder reuses the unchanged ones and only computes the others (e.g. added scans). With duringProcessing or endOfProcessing everything is recomputed.
Analysis and QC of the profiles
Besides running the EXTRACT_Profile pipeline (dmrifiberprofile run), dmrifiberprofile provides the tools that
analyse and QC the profiles, ported from the FiberProfileAnalysis scripts. dmrifiberprofile <command> --help
lists all the options of each.
flip-tensorReflect the tensor frame of a DTI NRRD along axes, for tensors whose components don’t match the frame of their header;
--voxel-framerotates components stored in the frame of the voxel axes.detect-tensor-flipFind the correction of the tensor frame that orients a DTI correctly, by the coherence of the principal directions along the tracts and, with
--reference, their agreement with an atlas tensor.parametrize-fibersResample fiber tracts on the arc length grid and store the arc lengths in the fibers, so that the atlas defines them once; replaces
dtitractstat -f.compute-axis1D axis of the tracts (the average curve per arc length bin), used by
impute.gatherCollect the profiles of several runs into one table per tract and metric,
<tract>/<tract>_<metric>.csv(rows: arc length, columns: the scans).imputeFill the missing profile values with a per-dataset SIREN on the (x, y, z, arc length) of the tract axes; uses a GPU when there is one.
qc-registrationQC of the registration of the subjects to the atlas: similarity of the deformed metric maps, angular error, CSF check and an age conditional normative model, with a combined outlier flag.
--build-normativebuilds that model from a reference cohort, including the mean tensor of each age bin that DTI_Register can register to.qc-profilesAge binned statistics of the profiles (
<tract>/<tract>_<metric>_agebinstats.csv) and their plots, and the QC of the profiles against prior (normative) statistics, which flags the profiles whose values leave the normative envelope or whose shape doesn’t follow it.
A typical sequence, from the parametrized atlas fibers to the cleaned profiles:
$ dmrifiberprofile parametrize-fibers Atlas/FibersRaw -o Atlas/FibersParam
$ dmrifiberprofile gather --profiles-dir Output_Profiles --fibers-dir Atlas/FibersParam --out-dir Profiles
$ dmrifiberprofile compute-axis Atlas/FibersParam -o FiberAxis
$ dmrifiberprofile impute --profiles-dir Profiles --axis-dir FiberAxis --out-dir Profiles_Imputed
$ dmrifiberprofile qc-registration --data-dir Data --atlas-dir Atlas --normative-dir Atlas/normativeModel --out-dir RegistrationQC
$ dmrifiberprofile qc-profiles --profiles-dir Profiles_Imputed --prior-stats-dir Atlas/normProfiles --registration-qc RegistrationQC --clean-dir Profiles_Clean
What qc-profiles reads
--profiles-dir takes the tables of gather (<tract>/<tract>_<metric>.csv) or, without gathering them
first, the profiles of a single run as EXTRACT_Profile writes them
(<output>/<datasheet>/00_EXTRACT_Profile/<metric>/<tract>_<metric>.csv, in either orientation), so one run can be
QCed on its own. --prior-stats-dir takes either layout as well, since the age bin statistics are written next to
the tables they were computed from.
The age of a profile
The age decides the age bin of a profile. It is the row of the scan in --age-csv, a participants / sessions table
(--age-column and --age-units describe its age column), else --age-regex on the column name of the
profile, ses-(\d+)m by default. The same table is used by qc-registration --age-csv and by the ageCSV
option of the DTI_Register module of dmriprep. Profiles with neither are named at the end of the run, as they take
part in no age bin.
Locations sampled outside the brain
A metric that cannot be 0 in tissue (FA, MD, RD, AD, NDI, ODI, …) is 0 at a position where the fibers of that scan
left the brain mask. That is a property of the location, so it is read as missing on every metric of that tract and
case, including those where 0 is a valid measurement (--zero-valid-metrics, the free water fraction by default);
--keep-outside-brain keeps them, and with --clean-dir those cells are written empty in the cleaned tables. A
profile with less than --min-valid-frac (0.75) of its positions left is flagged as an outlier, since too little
of it is there to judge.
See the README for the remaining options.
Development of a new module
Adding a module
Once initialized, users can add their custom module from scratch or existing system/user modules by following command:
$ dmrifiberprofile add-module <module-name> [--base-module <base-module-name>] [--edit]
Following command will generate initial skeletal files of module:
$ dmrifiberprofile add-module HELLO_World
Then you can test if the module can be loaded properly with:
$ dmrifiberprofile update
You can use your module right in protocol file.
if -b , –base-module is specified, new model will copy existing code and data from the base module. e.g.:
$ dmrifiberprofile add-module MYFIRST_Module -b EXTRACT_Profile
MYFIRST_Module will have same codes and data (module definition yaml file) from EXTRACT_Profile module with new classname and filenames.
Developer
Once module is developed and tested in the user module directory, one can just move that directory in dtiplayground/dmri/fiberprofile/modules and commit. Make sure the custom module does not exist in both the user and system module directories.
Removing user module
User module can be removed by:
$ dmrifiberprofile remove-module <module-name>
e.g.:
$ dmrifiberprofile remove-module MYFIRST_Module
[NOTE] System module cannot be removed by this command. Only user module can be removed.
Modules in other directory
You can just copy module directory to $HOME/.niral-dti/modules/dmrifiberprofile and check with $ dmrifiberprofile update command. Same applies for removal of user modules.