DMRI Prep
dmriprep is a tool that performs quality control over diffusion weighted images. Quality control is very essential preprocess in DTI research, in which the bad gradients with artifacts are to be excluded or corrected by using various computational methods. The software and library provides a module-based package with which users can create their own QC pipeline as well as new pipeline modules.
The general framework of dmriprep is: - The input is a dMRI/DWI datasets - The final output of a workflow/protocol is a dMRI dataset - Individual modules might generate their own additional outputs
Thus, for example, a tensor estimation module will write out a tensor image, a tractography module will write out a tractography result, etc, and in addition, the final output that is written at the end of any pipeline (which will be called *QCed.nrrd / *QCed.nii.gz depending on format) will be a dMRI/DWI dataset. This final dMRI data is either the output of the last dMRI modifying module in the pipeline or the same as the input dMRI data if the protocol does not contain a module that modifies the dMRI data.
About the Preprocessing part : README about Preprocessing
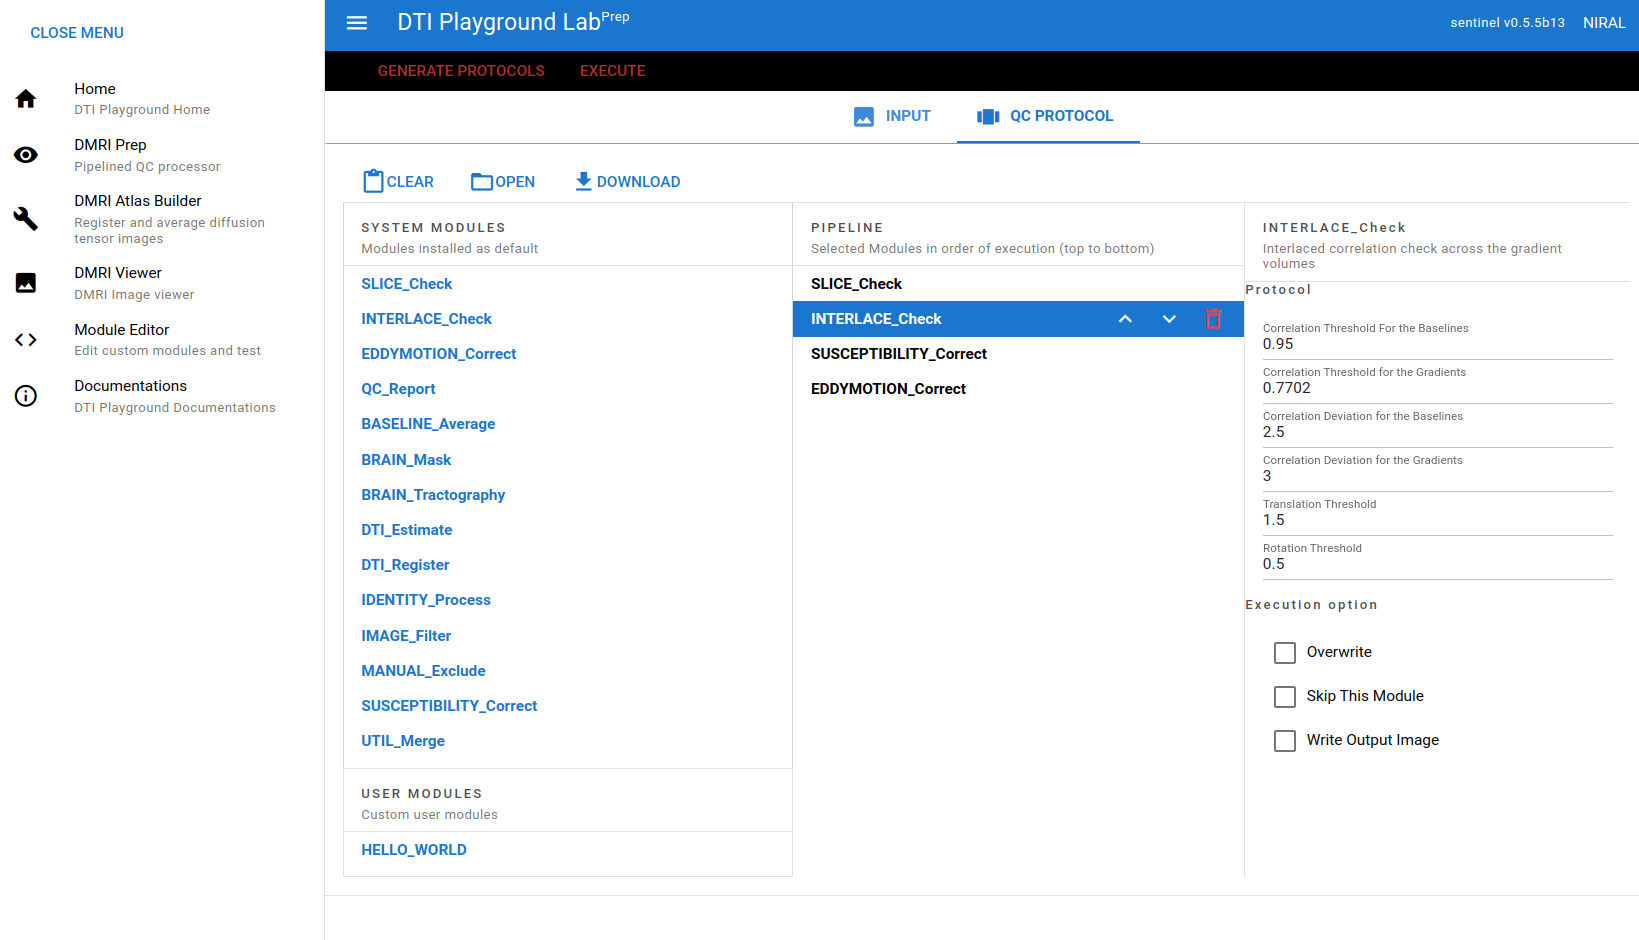
GUI Mode
DTIPlaygroundLab (Web UI)
Run:
$ dmriplaygroundlab
Then go to DMRI Prep menu. Once protocol file is made with IO options (image files, output directory, etc), click GENERATE PROTOCOLS button to generate output directory with protocol file. You can execute with EXECUTE button or use teminal command to start processing:
$ dmriprep run-dir <output-directory>
CLI Mode (Linux/Windows-WSL)
For Windows users, install WSL2 and linux packages with python 3.9 - 3.12 (3.11 recommended).
1. init - Initialize configuration (Default: $HOME/.niral-dti/dmriprep-<version>)
init command generates the configuration directory and files with following command. One just needs to execute this command only once unless a different configuration is needed. If you want to reset the initial configuration directory, you can run init again.:
$ dmriprep init
If you want to set different directory other than default one
$ dmriprep --config-dir my/config/dir init
Once run, config.yml and environment.yml will be in the directory.
You can manually specify the tool directory (which is generated by install-tools command) by –tools-dir option.:
$ dmriprep init --tools-dir <path/to/tool_dir>
2. update - Update if config.yml has been changed (e.g. in case of adding user module directory).
Changing config.yml file should be followed by updating environment.yml with running update command
$ dmriprep [--config-dir my/config/dir] update
This will update module-specific informations such as binary locations or package location used by the corresponding module. It simply updates environment.yml
3. make-protocols - Generating a default protocol file
The firstthing to do QC is to generate default protocol file that has pipeline information.:
$ dmriprep [base options] make-protocols -i IMAGE_FILENAME [-o OUTPUT_FILENAME_] [-d MODULE1 MODULE2 ... ]
if -o option is omitted, the output protocol will be printed on terminal.`-d` option specifies the list of modules for the QC, with which command will generate the default pipeline and protocols of the sequence. Same module can be used redundantly. If -d option is not specified, the default pipeline will be generated from the file protocol_template.yml . You can change the default pipeline in protocol_template.yml file. With two input images (opposite phase encodings), the default pipeline also has SUSCEPTIBILITY_Correct, before EDDYMOTION_Correct.
4. run - Run pipeline
To run with default protocol generated from protocol_template.yml:
$ dmriprep [base options] run -i IMAGE_FILES -o OUTPUT_DIR -d [MODULE1 MODULE2 ...]
-d option (default protocol) works as described in make-protocols command. But you need to specify “-d” for the default pipeline from the template. If -o option is omitted, default directory will be set to Image filename_QC. IMAGE_FILES may be a list of files to process. In case of susceptibility correction, IMAGE_FILES needs to have counterparts for the polarities. dmriprep automatically process qc for all the input images before the susceptibility correction stage.
To run with existing protocol file:
$ dmriprep run -i IMAGE_FILES -p PROTOCOL_FILE -o output/directory/
-p option cannot be used with -d option.
[NOTE] when using 2 image files for SUSCEPTIBILITY_Correct and other multi input modules, order of files can be important. For the SUSCEPTIBILITY_Correct, AP(FH), RL, SI phased file comes first. (e.g. $ dmriprep -i AP_img.nrrd PA_img.nrrd …)
Rerunning into an existing output directory
A module with a result from a previous run is not recomputed, unless its protocol or the global variables given with -g changed since that run (they are compared with the settings.yml stored in the module’s folder; that module and the following ones are then recomputed). –overwrite recomputes everything. Results written before 0.7.11 have no settings.yml and are reused with a warning until the run uses –overwrite.
Denoising and Gibbs ringing removal
DWI_Denoise (DIPY MP-PCA, the method of MRtrix dwidenoise, or Patch2Self) and GIBBS_Correct (DIPY, the method of MRtrix mrdegibbs, for full Fourier acquisitions) are not in the default pipeline. Both assume raw, uninterpolated data, so put DWI_Denoise first and GIBBS_Correct right after it:
$ dmriprep run -i image.nii.gz -o out -d DWI_Denoise GIBBS_Correct SLICE_Check INTERLACE_Check EDDYMOTION_Correct QC_Report
MP-PCA also writes the noise level map (<base>_DWI_noise_sigma.nii.gz), Patch2Self the RMS of the removed signal (<base>_DWI_noise_residual.nii.gz).
Age appropriate registration target
With a normative model of the reference atlas (DTI_Register option referenceNormativeModel, a folder written by
dmrifiberprofile qc-registration –build-normative), the DTI is registered to the mean tensor of the age bin of the
subject instead of referenceImage. The age is the protocol age (or the global variable age), else the row of the
scan in ageCSV, a participants / sessions table as used by qc-registration –age-csv (ageColumn and ageUnits
describe its age column; the subject and session are read from the path as sub-<id> / ses-<id>), else ageRegex
on the path, ses-(\d+)m by default. Without any of them the reference image is used, with a warning.
QC outputs
Besides the QC report (QC_report.pdf and QC_report.csv of QC_Report), the modules write tables next to the QCed image, which are also columns of the QC_Report CSV and of the cohort table of a batch. The per volume tables carry an original_index, the index of the volume in the input of the pipeline.
DENOISE_QC.tsv, GIBBS_QC.tsv: noise level and b=0 SNR in the brain (MP-PCA) or the residual of Patch2Self, and the mean absolute change of the Gibbs correction.
EDDY_motion.tsv, EDDY_QC.tsv (EDDYMOTION_Correct): per volume translations, rotations, framewise displacement (Power et al. 2012) and eddy outlier slices, and their summary with the b=0 SNR and the CNR of each shell.
DTI_fit.tsv, DTI_fit_QC.tsv, DTI_fit_carpet.png (DTI_Estimate): how well each volume and each slice agrees with the signal predicted by a WLS tensor fit, and the poorly fitted slices.
IMAGE_QC.tsv, IMAGE_ndc.tsv, IMAGE_QC_plot.png (QC_Report, option imageQC): the same numbers on the raw input (raw_) and on the preprocessed image (qced_) - neighboring DWI correlation, bad slices, and with bTableCheck the fiber coherence index of the b-table, which names the b-vector axis whose sign would raise it.
See the README for the details of each column.
5. run-dir - Run output directory
If an output directory is configured with protocol file, you can run it with following command:
$ dmriprep run-dir <output-directory>
Output directory can be generated from DTIPlaygroundLab (UI)
6. bids / run-batch - Process a cohort
bids processes the DWIs of a BIDS dataset with the BIDS-App interface, locally or as a SLURM job array:
$ dmriprep bids /data/study /data/study/derivatives/dmriprep participant -p protocol.yml -j 4 -t 2
$ dmriprep bids /data/study /data/study/derivatives/dmriprep participant -p protocol.yml -t 4 --slurm
$ dmriprep bids /data/study /data/study/derivatives/dmriprep group
Each DWI run is a dataset; when the protocol needs two images (SUSCEPTIBILITY_Correct), the runs with opposite phase encoding of a session are processed as pairs, with the phase encoding axis and readout time of the sidecars. -p takes one protocol, or protocols per acquisition (-p ‘*acq-dir79*=dir79.yml’ other.yml, first match); -d [MODULE …] uses the default protocol (as run -d), generated for each acquisition; the default pipeline processes the runs with an opposite phase encoded run as pairs, with SUSCEPTIBILITY_Correct. The output of each dataset is in <output_dir>/sub-<label>/[ses-<label>/]dwi/<dataset id>/ (the usual dmriprep run output); <output_dir>/batch/ holds the manifest, the protocols of the datasets and their state. –dry-run lists the datasets grouped by acquisition. Running the command again processes only the datasets that are not done; dmriprep batch-status <output_dir> shows their state. The group level writes a QC table of the cohort and the datasheet for dmrifiberprofile.
run-batch does the same for datasets listed in a datasheet (columns id, image_1, optionally image_2, protocol, output_dir, overrides):
$ dmriprep run-batch -m cohort.tsv -o /data/cohort_QC -p protocol.yml -j 4
See the README for all options.
Development of a new module
Adding a module
Once initialized, users can add their custom module from scratch or existing system/user modules by following command:
$ dmriprep add-module <module-name> [--base-module <base-module-name>] [--edit]
Following command will generate initial skeletal files of module:
$ dmriprep add-module HELLO_World
Then you can test if the module can be loaded properly with:
$ dmriprep update
You can use your module right in protocol file.
if -b , –base-module is specified, new model will copy existing code and data from the base module. e.g.:
$ dmriprep add-module MYFIRST_Module -b SLICE_Check
MYFIRST_Module will have same codes and data (module definition yaml file) from SLICE_Check module with new classname and filenames.
Developer
Once module is developed and tested in the user module directory, one can just move that directory in dtiplayground/dmri/preprocessing/modules and commit. Make sure the custom module is not existing both in system module directory.
Removing user module
User module can be removed by:
$ dmriprep remove-module <module-name>
e.g.:
$ dmriprep remove-module MYFIRST_Module
[NOTE] System module cannot be removed by this command. Only user module can be removed.
Modules in other directory
You can just copy module directory to $HOME/.niral-dti/modules/dmriprep and check with $ dmriprep update command. Same applies for removal of user modules.